Garageband Ipad Repeat Section
- Garageband Ipad Tutorial
- Garageband Ipad Repeat Section 1
- Garageband Ipad Repeat Section 8
- Garageband Ipad Repeat Section 2
GarageBand for iPad. GarageBand for iPhone. Logic Remote for GarageBand. Featured topics. Use Drummer Loops in GarageBand for Mac. Quickly add drums to your song using Drummer Loops, a type of Apple Loop that you can customize to fit your song. Learn how to use Drummer Loops in GarageBand. Extensive Garageband iPad Tutorial. Without further adulating GarageBand lets move on to the actual GarageBand iPad Tutorial. In this first section we will help you with some of the tips and other peculiarities that you must know before moving on to recording a song. Repeat the process until everything is recorded and then Tap Done. Step 1: A ‘Smart’ Beat GarageBand on the iPad is capable of producing eight simultaneous tracks of audio (or instruments). These eight tracks can be made up of various sound sources, you can record your own audio via the microphone or audio input, you can use built in Apple loops or your own samples and you can also use any of GarageBand’s excellent built in instruments.
In iLife, being able to copy and paste regions in GarageBand is useful: You can perform a task once and repeat it thousands of times. You can even copy multiple regions in different tracks at one time.
.Tap a track header to select it, tap the track header again, then tap Merge.In the track header area, tap the circles for the additional tracks you want to merge.Tap Merge.A new copy of the song is created, with the merged tracks replaced by a single Audio Recorder track. 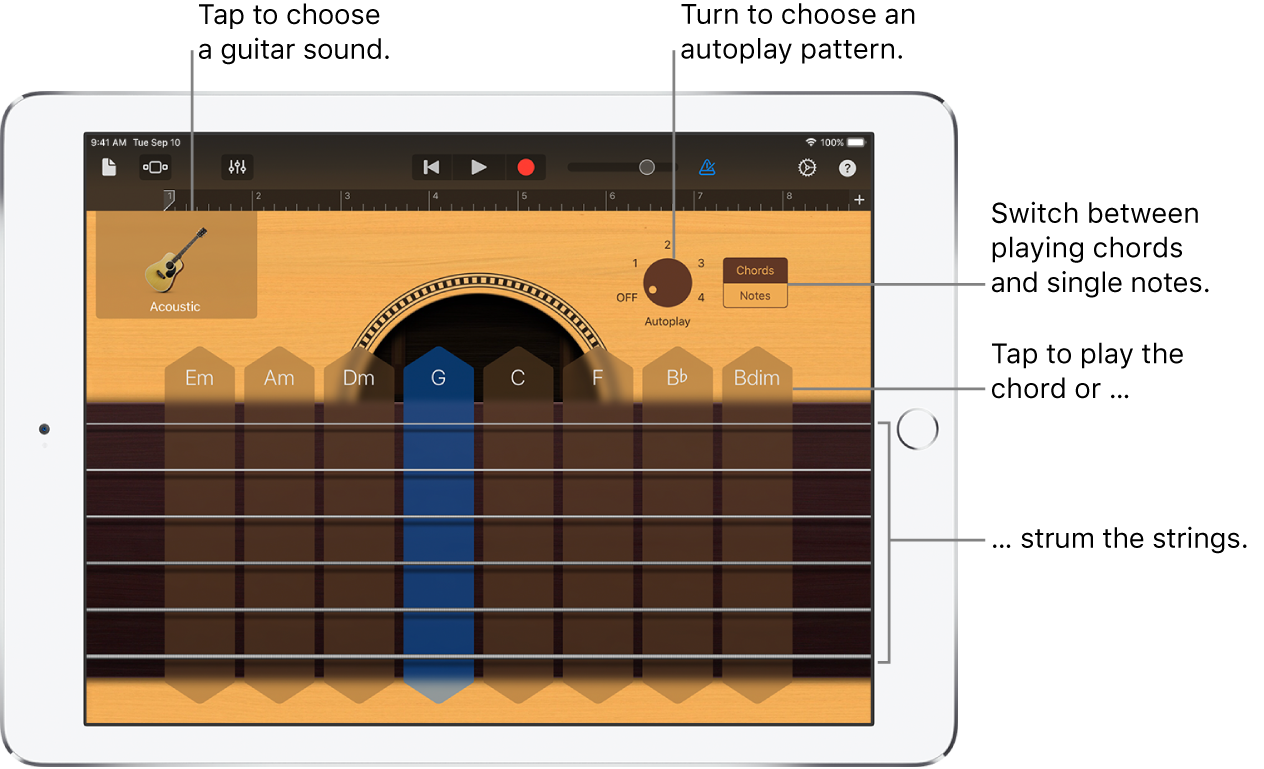 The original song remains available in the My Songs browser.You can also merge one or more tracks with the FX track. For information about using the FX track, see. Any effects recorded to the FX track are added to the new Audio Recorder track, and the FX track is turned off (so the effects are audible only on the new track).
Download old versions of TeamViewer for Mac. Share your desktop with this remote control utility. Atfer installing on the new Mac I just directly copied the TeamViewer of 15.2 to that old Mac, but still could not be opened: Hopefully the reason was that it was from other website, not official website. Mac os is too old for teamviewer.
For example, if a set of regions for bass and drum tracks are perfect for a few measures and you want to use them throughout the song, you can select the regions and then copy and paste them. Because you can copy regions from multiple tracks at a time (as in a vertical selection of regions), you can copy entire sections of a song to another place in the song.
Here’s how to select, copy, and paste in GarageBand ’11:
Selecting regions: Click a region to select it, and Shift-click to select multiple regions. You can also select multiple regions at a time by dragging an imaginary selection rectangle around all the regions you want to select. As you drag from a point in the timeline, any regions intersecting your imaginary rectangle are highlighted to show that they’re selected.
Copying regions: To copy a region, select it and then choose Edit→Copy (or press Command+C).
Pasting regions: To paste the copy in the track at a different location in the timeline, move the playhead to the point where you want the copied region to start and then choose Edit→Paste (or press Command+V).
To copy and paste multiple regions at a time, select the regions first, and then copy and paste them. If you hold down the Option key while dragging a region, you automatically make a copy of the region; when you drop the copy, it’s just like pasting it into the new location.
After you paste one or more regions, the playhead moves to the end of the first pasted region, which is convenient because you can choose Edit→Paste again (or press Command+V again) to paste another copy right next to the first one.
Cutting and pasting regions: To delete regions from one location and paste them into another, choose Edit→Cut rather than Edit→Copy. However, simply dragging the selected regions to the new location in the timeline might be faster.
Deleting regions: You can delete a region by selecting it and pressing the Delete key on the keyboard or by choosing Edit→Delete. If you want to move all other regions to the left in the timeline after deleting the region, choose Edit→Delete and Move — all regions on the same track move left by the length of the deleted region.
GarageBand, with its minimalistic interface and an array of advanced features wrapped up nicely in a slick design has made a name if not a legacy for itself for both beginners and professional music makers. The software comes loaded with tonnes of plugins that you can use for your projects, but that’s not even the best part, This app comes with a huge library of built-in instruments and audio effects which is expandable by adding third party audio unit (AU) plugins. Some of these are commercial plugins, but a lot many are also free synthesizers and effects.
If you want to download Garageband for PC, you can check the link provided.
In this article, we will discuss how you can use these plugins and what are our top recommendations for GarageBand Plugins:
How to add AU plugins to GarageBand:
When you download a plugin, some of them include an installer, and therefore the installation is done automatically. For those that do not come with an installer, repeat the following steps:
- Identify the Plugin by its component suffix.
- Place the Plugin in the support folder Macintosh HDLibraryAudioPlug-InsComponents
- Launch GarageBand
Garageband Ipad Tutorial
PRO TIP: If your version of the OS stops you from installing the plugins: Hold the ‘CTRL’ key on your keyboard and simultaneously click on the installer, and then select ‘OPEN’ from the pop-up menu.
Accessing Plugins in GarageBand:
Garageband Ipad Repeat Section 1
- Create a software instrument track.
- Click on the ‘EDIT’ tab in the right-hand side ‘Track Info Column’.
- Here you can select a custom AU synthesizer from the top of the stack, then there are the hardwired slots for the compressor and Visual EQ effects, and finally four slots for installed AU plugins.
Top recommendations for GarageBand plugins:
- Izotope’s Vocal Doubler is a powerful yet very intuitive plugin. It is free and enhances your vocal recordings to provide a natural doubling effect, adding richness and depth to your audio. The same technology can also be found in Izotope’s plugin Nectar isotopes, except that it has been re-imagined with a brand new interactive user interface that is dedicated to helping you achieve a great double vocal effect faster than ever. You can get the plugin for free by signing up for a free account at the Izotope website.
- AudioThing’s FilterJam is a multi-band resonant filter that delivers peculiar ring mod like filtered sounds. The input signal is divided into four bands that are then summed or multiplied together according to what mode you choose. The plugin can be both – very harsh or gentle, and it can add both brightness or depth for things like synth sounds, but it can also completely mangle acoustic sources. It is great for truly unique vocals or stringed instruments and allows you to completely warp and transform your sounds.
- Phazer from Adam Szabo is a fully customisable phaser effect that emulates the effect found in the virus synthesizer. You have six-stage all-pass filters controlled by an LFO with spread and feedback controls. Additionally, it is incredibly CPU efficient, which is great if you want to use it multiple times in a single project or soundtrack. If you’re looking for a step up from GarageBand’s built-in phaser options, this plugin can really help you.
- Ableton’s Knobs are three free and simple plugins that are designed to liven up your production work-flow. All three of these effects sound distinct from each other and are fantastic for anyone who is looking to add some unique sound to their projects:
Garageband Ipad Repeat Section 8
- The drive knob is a simple distortion unit that delivers serious dirty stereo distortion sounds that are perfect for your drummer track or percussion loops. It works best when used to apply just a little bit of grit to a baseline or guitar bit.
- The attack knob is a stereo transient shaper that affects the attack section of a waveform. It’s great for improving your drum loops, but you can try using it to help give stringed instruments an extra push to the front of your mix too, as it works just as well to simply boost a signal.
- The space knob is a fairly simple bright mid sized room reverb that works really well on pretty much anything you want to try with it, but it works wonders for acoustic guitar recordings in particular.
Garageband Ipad Repeat Section 2
Hope it helped, please write to us if you have any questions. Thankyou!